Monday 26 January 2015

Brailing for the Main

Firefly is a very stable boat, however she is also a dinghy at heart.

I've gone forward when sailing in a light breeze, hanging on to the handrails, and even then it was a little scary. With a gust of wind and an unpredicted wave, one could easily be in the drink. I would not want to be attempting to tie in the reef points on the fore part of the mainsail that I can't reach from the cockpit, in conditions that called for the reef in the first place.

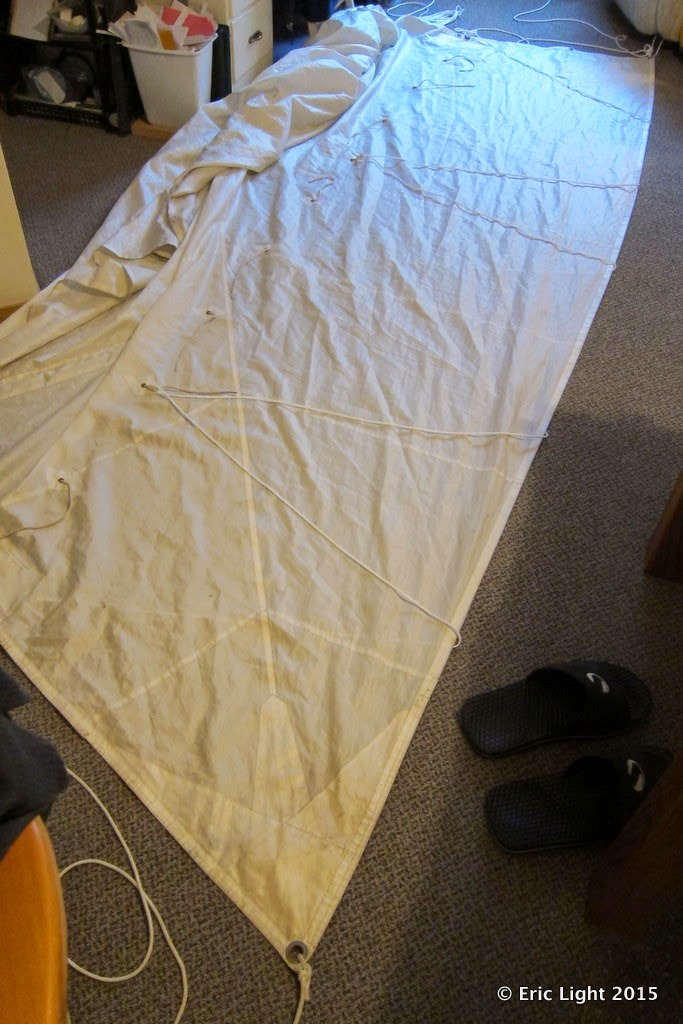
Maybe this has as much to do with the weather being wet and cool right now, but I've decided to try brailing the foot of the main. I'm sure that the jiffy reef system that I've set up will take care of the reef for the most part; I just don't like the idea of the foot of the sail flapping around adding to the confusion and possibly getting caught on something when tacking.

So I tied eyes into some of the reef points for a brailing line to go through:
Ideally the line would go through the sail to the other side, but I'm not ready to make holes in the sail just yet! So the line comes up to a reef point on one side then down and up to a reef point on the other side:
Note that the loop behind the sail to the right is in the wrong spot: I ended up moving it one reef point to the right. Here's the tack (still wrong on the back):
And here's the clew:
I'll be pulling the brailing line from the clew so that the foot gets minimized:

Something I noticed is that when I put the sail away, the brailing loops can slip off the ends of the sail. In a video of sailing barges that Robin pointed me to, I noticed that they had loops on the sail to contain the brailing line, so I'll probably do that as well.
http://youtu.be/b3wYcn0vG54
The sailing barges brail their sails horizontally, to bring the leech in to the luff, whereas I'll be brailing vertically to bring the foot up to the reef points.


Friday 23 January 2015

How to tie a boat

At Oak Bay I had a whole slip to myself, and I was able to tie Firefly in the middle so she didn't need a bumper. I found that the action of the boat bouncing around in the slip was jarring. The boat would surge one way and suddenly get stopped short by the dock line before surging in another direction. The dock lines would yank hard on the deck cleats, over and over and over. I didn't want my cleats pulled out of the decks, so I incorporated bungee cords to soften the action.

At Hidden Harbour, Firefly shares a slip with another vessel, hence it's a one-sided affair. But somehow, the bungee experience at Oak Bay has translated itself into another situation where she doesn't need a bumper! As you can see in the following photo, she sits out from the dock.

The trick is the bungee on the starboard side at the bow keeping the bow well out from the finger dock:

And then another bungee worked into the springline which is leading aft. Since the springline attaches to the widest part of the boat and pulls aft, it serves to keep the boat parallel to the dock, rather than pulling it in to the dock:

I'm not sure I completely understand the concept, but it works!
The stern line just keeps things tidy.


Monday 19 January 2015

Interior work

Here's the board stopper that keeps the daggerboards wedged against the cabin side. Cushion removed so as to see it:
I processed the photo so one can see the extra layers of fiberglass better, that I added to thicken the boards in way of the trunk. I used pieces of mat from John's scrap bin.

The photo below shows the port bunk with the bin lid back on, and the cut-out in the port bulkhead just ahead of the right cushion, so I can stick my feet out when I lie down there.
I've been shutting the doors and lighting the candle lanterns to see if they add any warmth to the cabin. There may be a difference of a few degrees. And it may keep the moisture level down somewhat. It would be nice to have a teensy heater going...

I made a swinging stopper to keep the cross-board from lifting out. I wanted to be able to take the board out to change out the water jugs when the time comes. Or whatever. Flexible space.
Gas can still temporary. I uncrated the folded zinc plates from the cardboard box I had them in, and slid them under that forepeak shelf. Plus there's a pile of flat zinc plates on top of the shelf, under the clear water jug. I plan to put a board fence around that pile to keep them in place, and to hide the pokey corners of the plates.

Boat as mini-workshop. It probably will never end. The stopper gets a hole to swing around. That's a cordless drill, mate!


Sunday 18 January 2015

Dream fulfilled, pretty much

On Friday it was sunny and windy from the West. The forecast said the winds would taper to 10 knots in the afternoon, then 5 later. I rigged the boat with a reef in the main and went out to find very large waves and lots of wind. Not quite ready for that on a winter day, I turned back. Turned out that soon after I tucked back into the slip the wind died completely, and the water was flat calm as I walked home.

Except for not actually sailing, that was the fulfillment of the dream!

The dream I had before I found the boat was that I could walk from my apartment along the waterfront walkway to the boat, step aboard, and go for a sail—and this was the first time I did that.
The sailing part will come. Unpredicted (but surely not unpredictable!) details came to life, like having a home-made sandwich in the sun in the cockpit, and brewing an espresso right there as well.
⎈ 
 
 The daggerboards are now sticking slightly in their slots after a number of layers of glass cloth were added in the area of the trunk. Except for buying some anchor rode for the 5 kg claw anchor, I think I've got most everything sorted out for sailing. And it's winter. So I've begun to organize the interior.

Since I cut out some of the bulkhead at the forward end of the port bunk, I can lie full out on it now. I used to keep the daggerboards on that bunk, but I've found the new boards store neatly against the cabin side to starboard, making a good back rest. Suddenly there's lots of horizontal surface to sprawl on!

Now the drawers and bins are getting re-arranged, paddles have a spot, rope is hung up and not piled up on the floor, and I made a retainer board for the forward shelf contents.
The gas can is there only temporarily. Although the seal on it is excellent and I don't smell gas at all in the cabin, I still want it out. It didn't fit in the seat lockers in the cockpit, so I need to figure out another spot for it. That spout is the problem. It's a great spout: turn the can upside-down over the engine, press down and it flows, stopping immediately when the can is lifted. I've not spilled a drop using it. But the spout won't fit in the cockpit lockers attached to the can, and I haven't yet found a cap to replace it with that fits the can!

Turning my attention to what to do for a galley. Here are most of the things it needs to house—with the exception of a couple of the cups. (I have a soft spot for cups and mugs.)
Two plates, two dishes, a pot, an espresso maker, some flatware. Missing from the group shot are a basin and the Whisperlite stove. The open space to the right is a bin in which I'm storing extra clothes, and something else that I haven't figured out yet.

Sailing Knife!

I thought a Spyderco knife might be good, but for the cost. When I was in Mountain Equipment Co-op recently I found this one that made a lot of sense and didn't cost so much. MEC changed their brands; mine is an Aqua Lung, but the same thing, a stainless squeeze-lock sheath knife:
I made the belt because the knife won't fit my fanny pack belt. The idea with the squeeze lock is that it's a positive click and it's locked in; squeeze the handle and it's released. The blunt tip is so you don't stab yourself when you're freeing yourself of something wrapped around you.