Saturday 30 April 2016

Tri trial

Checking out the fit—upside-down:

The waterline is supposed to be just under the chine knuckle of the main hull, so it looks like the amas will be just kissing the water.
Good view of the forward aka piercing the foredeck.
Leeboard guard:
On the starboard side, quarter-inch mahogany ply makes a straight face for the board to pivot on. The ends of the 16"-long board happily just happen to be equidistant from both the centreline and the outside of the hull, meaning that the guard is right in the middle of the curve, or "dead amidships".

A super leeboard is in the works.


Tuesday 26 April 2016

Forward aka tube

Measured many times before cutting, and got a different read each time, so took an average and went with that.
Held my breath while cutting into the decks! But it seemed to work out okay.
Used a hole saw and then reamed the hole into an oval with a burr bit. The akas happened to come out level with each other!
Sawed the tube ends off closer to the decks before fixing it in permanently, as I figured I'd just grind the ends off flush with the decks.
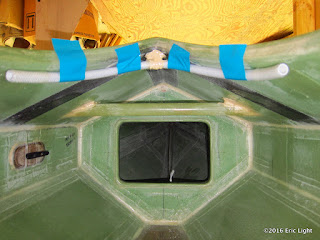
The photo below was taken when the boat was upside-down, then the photo was inverted to make sense of it. The black is carbon fibre tape. The micro-lite fairing filler (tan colour) was a mistake to use in this instance, as it sags.
The white tube is for the rudder line turn-around. I went to a lot of trouble to make the cockpit opening somewhat rounded at its forward end so that the rudder line would slide around easily—and then decided to put the line on the inside of the cockpit instead!


Friday 22 April 2016

First furniture

Installed a little shelf on each side by the aft bulkhead, close to where my butt will land. Forward of that I'm thinking of installing hanging net bags or something like that.
Found some paint from Firefly that looks like enough. So Golightly could be red & white. (I've abandoned the fluorescent look since I haven't found the right paints in small quantities.)

Presently I'm finishing hatch lids and fairing and sanding hull exteriors. All hulls are almost ready for paint. Placing and installing the forward aka tube is the next big thing. Hopefully I'll be able to put it in parallel to the aft one  .


Thursday 21 April 2016

Ama ports, aka sleeve

The aka access ports will be circles of mahogany ply, screwed on with silicone sealer under.

The aft aka sleeve is firmly attached:
The sleeve was made on the pipe, with two wraps of heavy plastic sheeting for spacing, and many wraps of waxed paper (the width of the roll's worth) as a parting agent. Two wraps of 6-oz glass cloth pre-saturated on the table with epoxy made up the sleeve itself.

The sleeve was attached with lots of chopped strand epoxy goop (strong!) to fill the corners, and three layers of 6-oz glass cloth saturated with epoxy. The aka pipe slides through it easily, yet the fit is tight enough that I believe it won't be noisily chattering in certain conditions.


Thursday 14 April 2016

Ama decks

For some reason I thought I needed an access port in each ama. So I made holes and rings and glued the rings to the undersides of the decks:
I didn't bother with neatness, partly because these amas are supposed to be concept test units, but mostly because who cares about the inside. There will be a plate on the outside, and the rings make a thicker part to bed screws in.

All taped up and nowhere to go (tape is substituting for clamps):
 I enjoy that the nice sweeping curve of the sheer comes from straight-edged planks.
The "rub rails" were flattened on their top edges to accept the decks, and rounded underneath for the glass cloth to grip without kinking and making air pockets, which would happen with sharp corners.


Thursday 7 April 2016

Aft hatch

The lid for the after hatch was traced from the opening, glassed on the underside, and an inner piece glued on. Then comes the edge piece:
Making a frame to frame the lid.
Without the frame, the sides bow out. Plastic wrap (re-used wrapping from the cloth purchase) will keep the lid from being glued to the frame base:


More work on the amas

The ama sides were wired together along their bottom edges with stainless steel wire:
Then a fillet and a single layer of glass tape was applied on the inside, burying the wires:
(The rub strips were temporarily screwed on, to make sure the sides opened up in a nice curve.)
Then the wire ties were extracted:
John noticed that I was heating the short end with my mini torch, as I had done in the past with copper wire that I used at that time, so I could pull it through the epoxy that it's embedded in inside. He showed me that stainless wire just needs to be grabbed firmly and pulled out, as it's stronger and smoother than copper. Great tip!!

The bottom joint was then rounded, and a layer of glass cloth applied:
The nearer ama has had a "flood coat"—a second coat of resin—applied, to fill in the weave.


A weighty issue

I've been asked a number of times, "How much does it weigh?" or, "What will it weigh?", to which I've had to answer that I don't rightly know. Well, this morning I took my ancient fish scale to the shop and put the boat on it:
(Two notes: 1) balance point is midships, 2) amas on the right)
Now I know that it weighs 37 lbs as it is. It'll probably gain another couple of pounds when I move the furniture in ;-) .


Wednesday 6 April 2016

Amas & placement

The sides for the amas got a layer of 4-oz glass:

Checking out the ama placement:
The stick is 7' long.
The waterline is just under the main hull chine amidships.


Monday 4 April 2016

More coaming & lip

When I put the pieces together, the coaming was too high with three layers of ⅜" foam, so I used two layers instead.
Couldn't decide what to do with the after end of the coaming, so I just cut it off at the end of the cockpit and rounded it. It should really end better. Maybe I can come up with something.
 
Coaming and lip are now glassed (need finishing). The hull is basically done, could go paddling tomorrow, but I'll restrain myself. Still lots to do.
(Maybe what I'm calling the hatch lip is actually a coaming as well?)


Friday 1 April 2016

Coaming and lip

I put the first layer of the cockpit coaming on today:

Here's the plan:
The forward-most part was done with a smaller piece, and the side pieces were long, without too much curve. There's always a loss of material when cutting out pieces like this, but there's enough here to complete the job, with probably some left over.


The deal is, this stuff will bend nicely if the outside of the curve has been lightly glassed. The epoxy resin is quite flexible when thin. The foam compresses on itself, making itself denser and possibly stronger—if that makes any sense. If you try to bend it with the glassed side on the inside of the curve, the glass just cracks and splits in a straight line as the stuff folds neatly in half.

Here's more foam-bending goodness:
I measured and cut long, put each bend in gently in sequence, then cut the ends to match.
The bends need to be forced into the corners, but once there behave well.
That aft hatch opening reminds me of a submarine. . . Maybe I should paint it yellow? If I did—and that's a very big "if"—it would have to be a bright, rich yellow, like this: