Monday 29 February 2016

Forms out

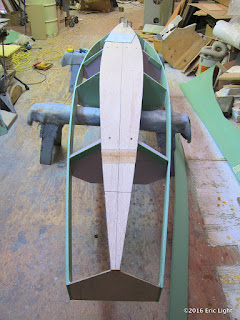
Here are some photos of the hull without the forms. I've since glass taped the places where the three forms were. Whenever I have a bit of resin left over from glassing something, I put it on the mahogany plywood bottom.
Andrew pointed out that the bottom plank is foil-shaped.
 The side panels of this boat are 1" higher than the plans call for.
I'm leaving that stick long 'til I get the deck on and see how much of it I need.


viewing photos

I just discovered that I could see a higher-resolution version of the photos on the blog. Here's how:

After clicking on an image, right-click on it and choose "View Image". 

The image will come up again clearer, and in my case comes up with a zoom icon with a "+" in it to make it larger yet—if the original is large enough to begin with. My seagull below, for instance, gets smaller, 'cause it's such a small file.

-e.
- - -


Friday 26 February 2016

Working and dreaming

The builders' tape worked okay, but still comes off fairly easily. At least it didn't relax off overnight. The boat is now upright and I'm glass-taping the inside seams. Dreaming of sailing, and what rig and amas to use.

Above is the rig for the larger Paulsboat, copied onto the Rio Grande hull (the one I'm building). The Paulsboat is 15' x 36" compared with the Rio Grande's 13' x 28½", meaning that this boat is two feet shorter and 7" narrower. I'm expecting to sail only when the amas (outriggers) are on, thus figure it can carry the sail of the larger boat. The Paulsboat also has a small mizzen.


Wednesday 24 February 2016

Overturned

Before I taped the bilge panels in place, I stuck some little bits of foam on the sides between the molds and frames, to help the bilge panel match up to the side panel and not sag:
The bits were applied with hot glue. Although they're on pretty well, they come off easily enough.

The duck tape didn't work out: it came unstuck overnight, and left bits of sticky behind. So I'm trying some builder's tape. It seems to cling well, and doesn't seem to have as thick a layer of sticky on it:

Finally, right-way up and boaty-looking!

Below: One layer of 3" glass tape on the first two sections. (I wanted to get the bow cemented in place first, since it's the area of most stress.) I'll put a layer of 2" tape over the 3" that's there now. For the rest of it, I'll put the 2" tape on top of the 3" as I'm doing it. I had thought I'd do the 2" after the forms were taken out, to fill the gaps more evenly, but I'm realizing that it's too much work because it needs to be washed and sanded before another layer goes on.
It needs to be washed and sanded before being painted as well, so no point washing and sanding twice, if it can be avoided.


Tuesday 23 February 2016

Bilge panels

I had some trouble with the aft bulkhead. After some messing around trying to make it work, I realized I'd made a mistake in the numbers. Once that was corrected, things started to move again.

The boat is now upside-down on the saw horses, getting the bilge panels fitted:
 
Below: the bilge panels roughed out, with 4-oz glass on their inward sides:
 I decided I'm going to follow the Gougeon brothers' advice and wash all epoxied surfaces before bonding to them. (pail of water at top of picture above)

To make the curve of the bow, I used my 5-foot aluminum straightedge:
But what I noticed was that that little tongue of plywood ahead of the bulkhead dipped down along with the ruler, so I clamped it with a piece of hardwood. The bilge panels won't be putting the same downward pull on that piece, so it needs to stay as it is.

Below: with a 2' long piece of hardwood straightening out that tongue of ply:
I put the bilge panel against the ruler and drew the curve onto it, then had to shift the clamps and ruler to the other side of the centre line in order to do the other panel.

I wanted to put both bilge panels on at the same time so I wouldn't be distorting the hull. Below, they're temporarily taped on:
Next will be to straighten out that bow seam a little, tidy up the joints here and there, then I might hot-glue tack a few spots. I'll put that duck tape on all of those seams, flip her over, and glass tape the insides of the seams.

Just as a point of interest, here's John's shop phone:
It has so much resin and gel coat on it, yet it still works!


Saturday 13 February 2016

Fun with foam

I decided that the temporary plywood forms were going to be too heavy to hang off the sides of the hull without distorting the side panels, so I made them out of 1" pink insulation foam instead.

I screwed the side panels onto the forms with drywall screws, which will come out before the outside of the hull gets glassed:
The two bulkheads need to be glassed before adding them to the assembly above. 

I decided to make my own hatch for the forward bulkhead. I noticed that the ⅜" foam with 4-oz cloth (in cured resin) on it can be curved by hand, as long as the cloth is on the outside, so I made the hatch cover with a lip:
 The sides had to be pressed in when gluing it up or they bowed out, so I made a form and lined it with plastic.
Below, the corners of the hatch cover still need to be rounded. Sandpaper works fine, but I needed a mask, which is at the shop, so will finish shaping it there:

Forward bulkhead with opening, hatch cover in background:
 How I did that: I first cut the opening in the bulkhead, then glassed one side of the bulkhead. Before the epoxy set up, I glued a rectangle of foam on top of that, trying to line it up well, as I had made the piece only ¼" or so larger on each side than the hole that it covered. After the epoxy set up, I cut the hole out of the added piece to the size of the opening, which left just a lip on top of the 4-oz glass. I did the same with the other side:
Above shows the forward face of that bulkhead, with the hatch cover on the after side of it.

The lip on both sides of the hatch opening make a frame that strengthens the bulkhead around the opening. I'll cover that frame with one or two layers of 4-oz cloth on the diagonal, with thickened epoxy in the tight corners. (The diagonal-weave cloth takes sharper corners without lifting off the work and leaving air underneath. It's also stronger, as the strands of both directions cross everywhere. And, it takes complex curves better.) The diagonal-cut cloth will wrap around the frame from one side of the bulkhead to the other.

You can see below that the hatch, although the opening is only 10½" wide and 7" high, takes up most of the area of the bulkhead. I just checked, and my tent and air mattress both fit through the opening. The sleeping bag doesn't, though, so it'll have to go in the after hatch, which will be about 12" by 14".


Saturday 6 February 2016

Working with foam, glass and resin

Polyester versus Epoxy

I first thought I was going to use polyester resin on my project. After all, it's in abundant supply in the 'glassing shop, is relatively inexpensive, and kicks off quickly, enabling a number of steps to be accomplished in quick succession.

John said the best way of using polyester resin is to cover the foam first with a "hot" sealing coat; meaning adding extra hardener to make it kick faster. The reasoning is that then there won't be any time for a reaction between the foam and any styrene in the resin. That's my understanding of it, anyway.

So I did that, using unwaxed resin, and when it was hard I put a piece of glass tape on, with an end sticking over the edge with which to pry it off. In that polyester resin test sample, the tape easily pulled off the first layer of resin, the sealing coat, before the tape tore:
For the epoxy test samples I just added glass tape to the foam and wetted it out with the resin. After a good cure, the G2 resin pulled off the foam, taking some of the foam with it, and the tape didn't tear. The West System epoxy wouldn't pull off the foam, tearing the tape instead. I must say, it wasn't a perfectly scientific test, as I hadn't left the same size of tab to pull on in the West sample. But the West sample test was more to check the new batch of resin & pumps, as I had already decided from the polyester/G2 testing to go with epoxy, for more certainty in the bonding.

Cutting the Glassed Foam

I started with a utility knife, then switched to my pocket knife to cut through the 4-oz cloth, finishing off with the utility knife to cut through the foam. This worked great as far as accuracy: I could cut exactly on the line. But it was hell on the hands, and took a long time.

John offered a jig-saw he'd modified to make a shallow cut, with a metal-cutting blade in it, which worked a treat. It was more difficult to cut exactly on the line, but was way faster and so much easier on the hands:

I put some styrofoam blocks under the work to lift it off the floor a bit. The blade extended ½" below the board I was cutting. Above, I'm getting out the second side plank.

Backside Reinforcing

As I was lifting and moving the glassed-one-side foam around—especially the long & skinny side panels—I was ever conscious of the butt joint between the two panels, and made sure to keep them oriented so that when the glassed side was down, the ends were supported. I could just imagine them folding away at the joint. Now I'm ready to put some glass tape on that joint. I sanded a bit of a hollow first, with 20-grit, so that it wouldn't be as visible when the outside gets glassed:
Now I need to wait until Tuesday to get back in there and do some more damage! ;-)


Friday 5 February 2016

Progress

The trimmed bottom panel. After end:
The idea is to wait until the panels are all together before glassing the outside of that joint.

Forward end:

The two ⅜" foam panels were laid on the shop floor, butted, and held in place by a screw at each outer corner. The first hunk of cloth I bought was cut too short. This is it, smoothed over the panels, before I took it back:
Thankfully, the error was corrected. Below is the new cloth, now with epoxy resin on it. I ran out of epoxy after I'd got just past the butt joint. I laid a smooth piece of metal on the joint, taped with packing tape to keep it from sticking, and weighted down somewhat to make sure the two pieces joined evenly as the resin cured. Note the smooth, shiny surface that the taped metal left:
The bottom part above was the first part I epoxied (yesterday), and I put too much resin on it. Today I used less (top part above) and it went on well, with a plastic spreader.

I cut the excess glass cloth off the edges of the part I did yesterday, which cured well in spite of the low temperature in the unheated space (probably between 6 and 9 degrees Celsius):
And started drawing on it!
The lines I drew above at the bottom were wrong. I hadn't measured the stations out correctly, so had to do it over.

The hull panels will be cut out of this material, and this side will be the inside, so I put four ounce cloth on it. The outside will get 6-oz cloth. I'm using West system 105 resin with 206 fast hardener.
Here's a screwy photo:
This is one of the screws that held the pieces in place while they were glassed. It's in a part of the panel that won't be used for the boat, and will be cut out to unscrew it from the floor.